What does that spell?! FALL! It is almost here and I could not be more excited. Seriously, besides a full fledged blizzard winter, fall is my second favorite season. The leaves turn such amazing colors, the crisp air is so refreshing and it is just cool enough to wear a sweater.
This month for the Silhouette Challenge the theme was Home Decor. As some may know, I am all about decorating. So for this challenge I really did challenge myself with something I've never done. That is building an object out of paper, as well I finally got the silhouette pens and the double sides adhesive. So this month is a melting pot of new things for me!Here is what home decor and a touch of fall looks like for me this year.
For this project to build the letters I used just regular colored orange and black textured card stock and my glue runner. I purchased the Silhouette designer edition from SVGtools and was given a credit to SVGcuts for $10. As soon as I saw these awesome letters I knew I needed them. Seriously, there are SO many projects that can be done with the letters, don't be surprised if you see them around again.
I transferred the letters into the Sil program and the cuts are already line up to fit on a 12x12, they also have smaller sizes too. I watched the video on SVGcuts website to help me figure out how to put the letters together. It was extremely easy and took about 30 minutes to put all of the letters together total.
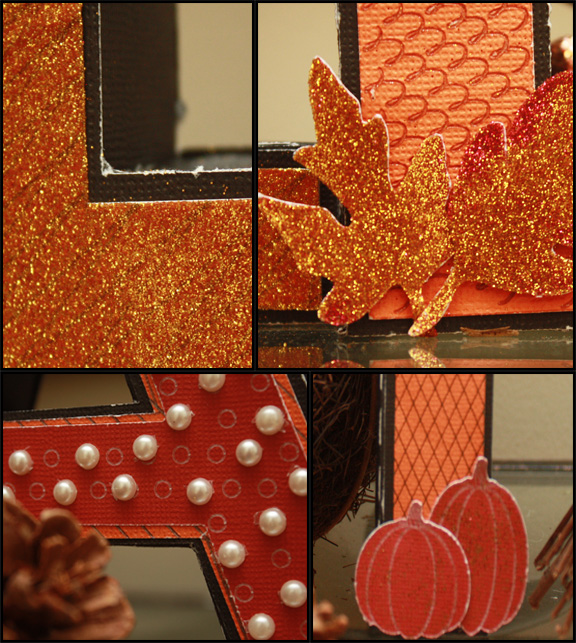
Next I used the sketch feature in DE(designer edition) to create lines inside the letters for sketching. On the A I used the rhinestone filler though to make little dots all over the face for a different feel. I have put off buying DE for years, I wish I would have done it much sooner. There are so many awesome tools in it! Next I used my black and dark brown pens and told the Cameo that we were using sketch pens instead of a blade. It drew them on just the same as if it was cutting out the letter. I love all of the different color options too.
For the little accents I used double sided adhesive and cut out two little leaf shapes and one of the L face fronts to cover in gold and red glitter. I really love how they turned out. It was also very simple to cut out and brush the glitter over. Mind the I attached the double sided adhesive to another piece of card stock that was cut in the exact same shape. it is much easier to work with complicated shapes this way.
Then I put everything together on our front table after finding my extra fall decor out of storage boxes in the garage. This project has been one of my favorites by far. It really took me out of a comfort zone with my paper crafting, but was very fun and exciting at the same time. As well the project was probably one of the easiest I have ever done too. I highly recommend the letters, why buy them at a craft store when you can make as many as you'd like at home!
I hope you enjoyed this months challenge. Have any comments or questions? Leave me a line below!
Also please take a second to subscribe and be updated on all the fun silhouette challenges, other projects and family life here on Home At Eight. Thank you for stopping by.
Want to Check Out More Silhouette Projects?
My Silhouette Challenge buddies and I are all sharing projects on our blogs today, so peruse the projects below for a wealth of Silhouette inspiration!
1. The Moberg Family // 2. Sandpaper and Glue // 3. American Honey // 4. Weekend Craft // 5. Grey Luster Girl // 6. From Wine to Whine // 7. Cutesy Crafts // 8. Practically Functional // 9. Home At Eight // 10. McCall Manor // 11. Dragonfly & Lily Pads // 12. Adventures in All Things Food // 13. Create it. Go! // 14. Please Excuse My Craftermath... // 15. The Outlandish Momma // 16. The Sensory Emporium // 17. My Paper Craze // 18. unOriginal Mom // 19. My Favorite Finds // 20. Architecture of a Mom // 21. Black and White Obsession //


Super cute! I've never build 3-D letters from paper; I'll have to try it!
ReplyDeleteThanks! It's a lot easier than I thought it would be.
DeleteI love how you combined a bunch a host of new-to-you techniques for this challenge. Way to embrace the challenge! Plus, your letters came out fantastically!
ReplyDeleteThank you! It is a lot of fun having so many new things to use!
DeleteWow, those letters look great! I can't believe you just made them out of paper. I think I may need to get that alphabet file, too...so many possibilities!
ReplyDeleteGET IT!! It seriously was one of the best downloads I have had in a while. Think of Halloween, Thanksgiving and The Holidays. Thank You!!
Deletegreat job! and a great way to use the sketch pens! Being able to change up plain paper is great!
ReplyDeleteThank You!!
Deletethis came out so good! I love it! I've yet to try out sketch pens, they seem so intimidating :) haha
ReplyDeleteThank You! Maybe try the pen holder first and see if you like it.
DeleteThese are awesome! I am so pinning this! It turned out amazing!
ReplyDeleteThank You Carrie!!! Pin Away!
DeleteThese letters turned out great! I love all of the little details you added! Great job.
ReplyDeleteThank you very much Holly!
DeleteWow these came out great! I may have to do this to jazz up my table at the shop! Love it.
ReplyDelete